

How Much Should I Pay The Carpenter To Put In Insulation And Sheetrock In A 12 By 28 Size Roof
How to Soundproof a Room
Cut down on the noise coming into or going out of your living area with these proven sound-dampening materials and techniques.
![]() Time
Time
Multiple Days
![]() Complexity
Complexity
Beginner
![]() Cost
Cost
Varies
Introduction
Cut downwards on the noise coming into or going out of your living expanse with these proven sound-dampening materials and techniques.
Tools Required
Materials Required
- one/two-in. plywood
- 5/8-in. drywall
- Acoustical dampening adhesive
- Cellulose insulation
- Door gasket
- Door sweep
- Drywall screws
- Electrical box extenders
- Fiberglass insulation
- Articulation compound
- Resilient channel
- Silicone caulk
- Whisper clips
- Forest transition strip
- Piece of work gloves
About Soundproofing Walls
In about every way, the modern drywall-over-studs wall is better than its timber-and-masonry and plaster-and-lath ancestors. It'due south fast and piece of cake to build, lightweight and makes the most of cheap materials. But when it comes to stopping audio, the modern wall is a flop.
This article will show you how to make these walls (and ceilings) block sound amend. Soundproofing walls involves ripping the existing drywall off the walls (and perhaps the ceiling), filling the walls with fiberglass insulation, attaching metal strips called "resilient channel" to the studs, and fastening new drywall to the channel.
This straightforward project to make your room soundproof doesn't require specialized tools or high-level construction skills. Anyone who has experience hanging and taping drywall, along with a little carpentry and electrical know-how, can soundproof a room.
However, soundproofing is a messy, labor-intensive projection. To minimize household havoc, information technology's best to focus on ane room at a fourth dimension. The room might be a place that you desire to go on sound out of—a home office, for example. Or it may be a room you desire to keep audio in—like a dwelling theater.
This project is also one of our domicile theater design ideas.
Project step-past-stride (ten)
Step 1
Sound-Reducing Materials
Resilient channel acts every bit a jump between the drywall and studs. When sound waves strike a wall congenital with resilient aqueduct, the drywall can vibrate independently without transferring the vibration to the studs. The metal channel is available at some habitation centers and all drywall suppliers.
- Fiberglass insulation batts are bachelor at home centers. Although "acoustic batts" are available, patently old unfaced R-11 thermal insulation works merely as well. Don't spend more for R-13 batts; a college R-value may actually cut the STC rating slightly.
- Type X five/eight-inch drywall is bachelor at lumberyards and home centers. Type 10 drywall is meant for fire-resistance, but since it's denser than standard drywall, information technology also stops sound better, especially when used with resilient channel.
- Acoustical sealant is available at drywall suppliers, just silicone caulk found at home centers is as well a proficient choice for sound proof caulk. With either type, y'all'll demand lots of it and will probably salve a few bucks past ownership a large caulking gun that uses the more economical thirty-ounce tubes.
- For attaching the channel to studs, employ 1-1/4 inch screws. For attaching drywall to channel, apply i-inch screws. Fine-threaded screws grab on to resilient channel better than the coarse-threaded versions.
- Door gaskets, door sweeps and transition strips are available at dwelling house centers.
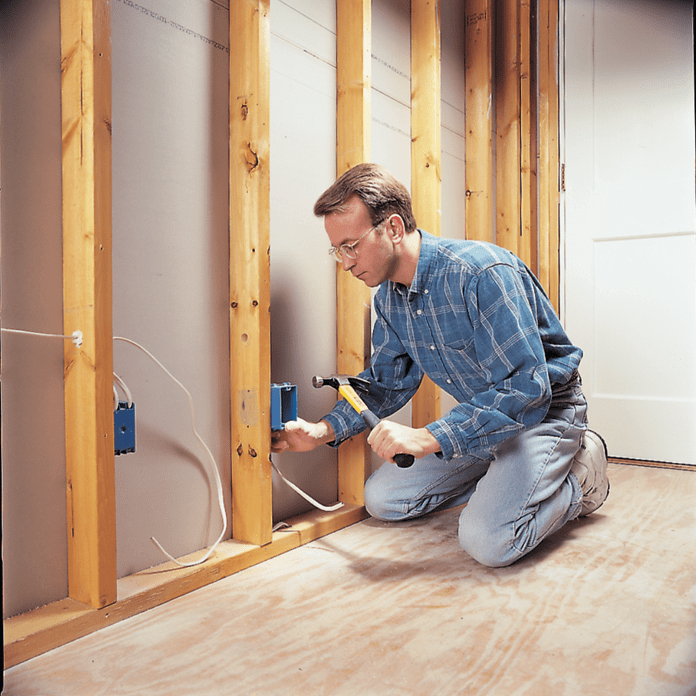
Motility Electrical Boxes
- Turn off the ability at the main panel before working on electrical systems.
- Move electrical boxes that share the aforementioned stud cavity so that they're separated by at least one stud.
- To permit for the 1/2-inch resilient channel and v/8-inch drywall you'll use afterward, mount boxes so that the outer edge of the box is 1-1/viii inch from the stud.
- Pro tip: Boxes that don't need to exist moved can be repositioned so they protrude 1-1/8 in. Or you can employ box extenders.
Step 2
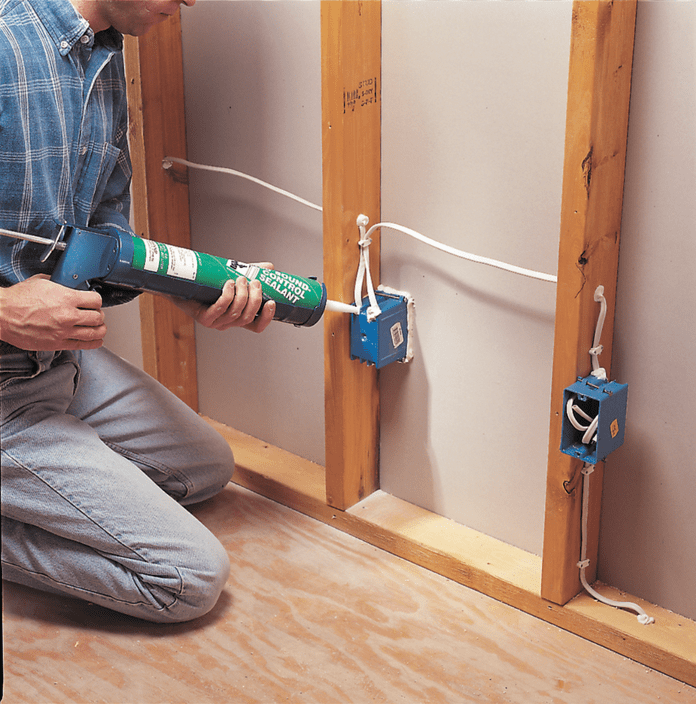
Seal the Boxes
- Use acoustical sealant or silicone caulk to seal around electrical boxes that serve adjacent rooms.
- Seal openings in the boxes, holes through studs and plates, and any openings in the drywall or framing.
![]()
Step 3
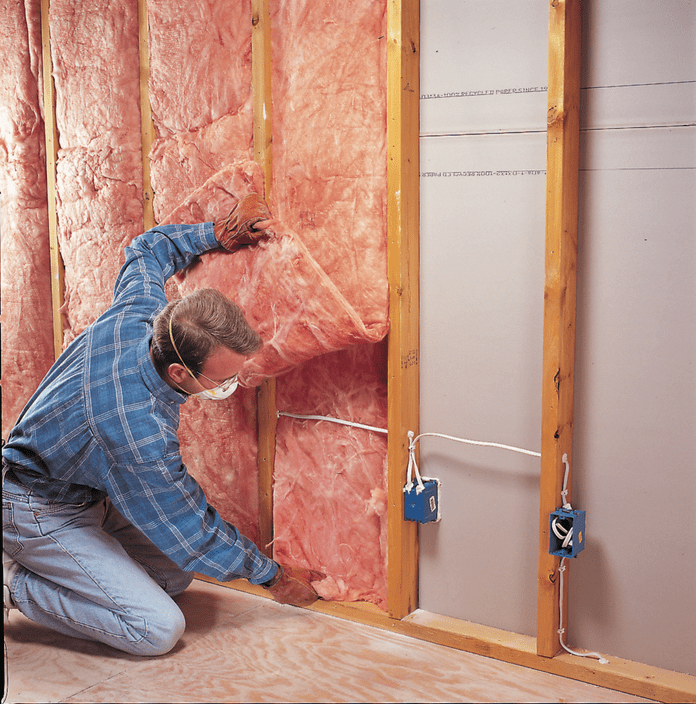
Insulate the Walls
- Fill stud cavities with R-11 fiberglass batts.
- Notation: The insulation should completely fill each cavity without open up gaps or pockets.
- Split the insulation to fit around pipes or electrical cable.
- Cut the insulation with a utility knife so information technology fits squarely around electrical boxes.
- Pro tip: Vesture gloves, a dust mask and eye protection when working with fiberglass.
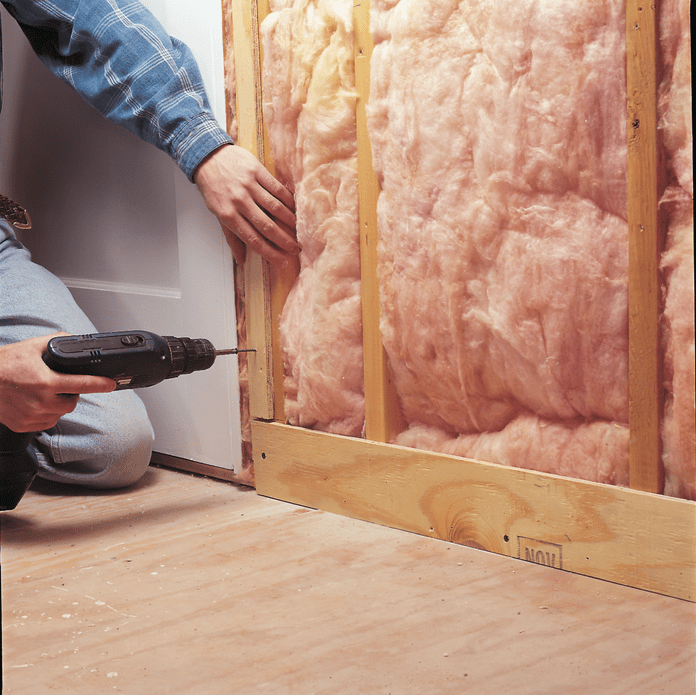
Pace iv
Screw on Backer Strips
- Spiral or nail strips of 1/2-inch plywood to wall framing effectually doors and along the floor.
- Note: The plywood just provides a solid backing for nailing on door casing and baseboard later on. Resilient channel is springy and holds nails poorly.
- Stuff sound dampening insulation into the gaps effectually door jambs.
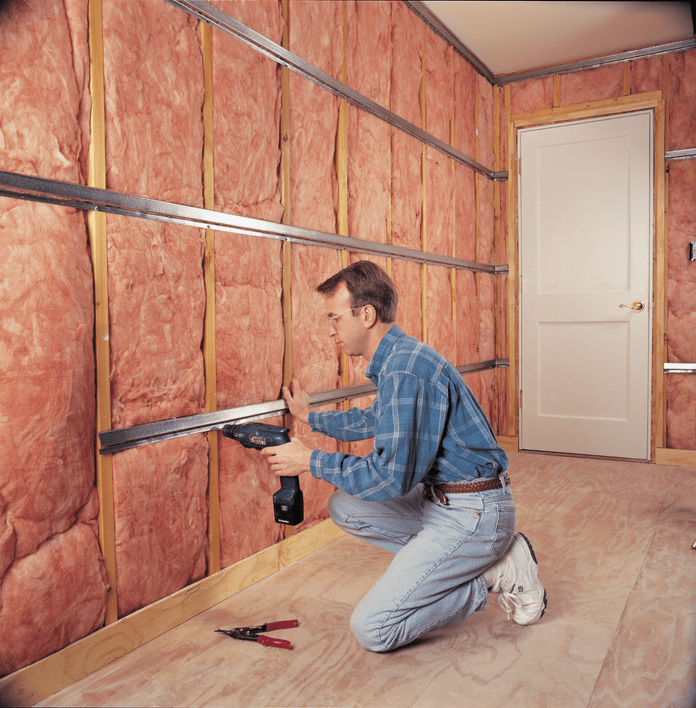
Pace 5
Attach the Resilient Channel
- Spike the resilient channel to studs using 1-1/iv inch drywall screws.
- Note: The channels should be spaced no more than 24 inches apart on centre, and the top of the upper channel must be below the elevation plate.
- Pro tip: Mount channels with the drywall flange upwardly.
- Install channels so they don't run more than 1 inch past studs.
- Overlap the ends.
- Pro tip: Resilient aqueduct is easy to cut with aviation snips or metallic shears.

Projection Alternative: Soundproof a Wall Without Demolishing Information technology
Cut holes at the top of each stud cavity and accident cellulose insulation into the cavities. Cut new 5/eight-inch drywall and so information technology's one/four inch curt of the flooring and ceiling. And then attach the new drywall sheets using special acoustical dampening adhesive and drywall screws. Caulk the gaps with acoustical caulk.
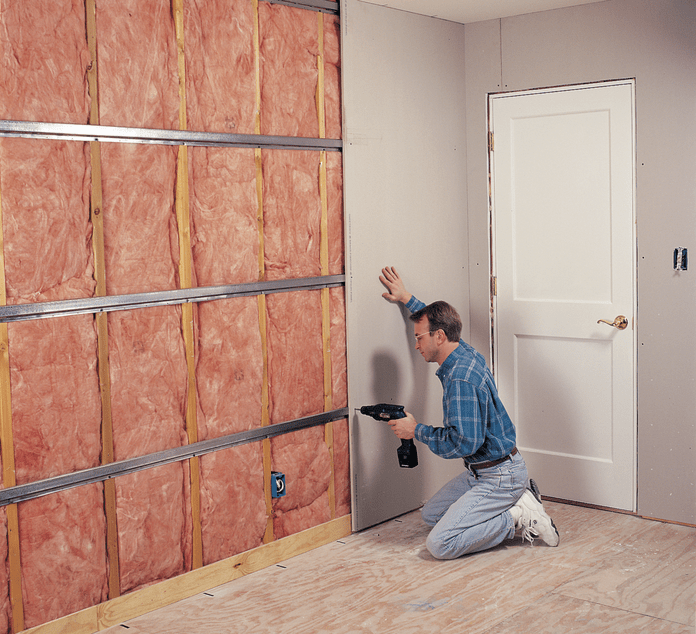
Step six
Attach Drywall
- Mark the stud locations on the floor and ceiling so you tin avoid them.
- Screw drywall to the channel'south flange with the drywall sheets running vertical. Use 1-1/iv inch fine-thread drywall screws spaced no more than 12 inches autonomously.
- Note: On ceilings, the sheets must run perpendicular to the channel.
- Pro tip: Screw into the channel, not into the studs.
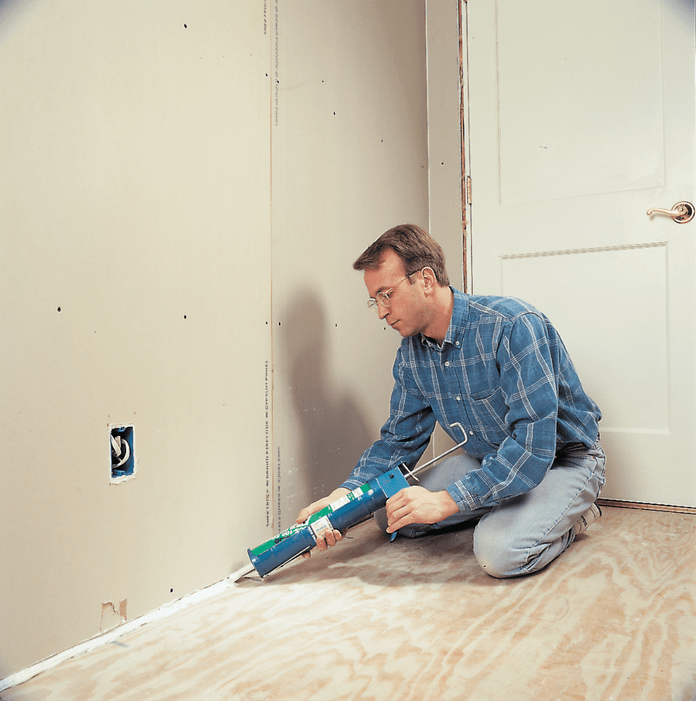
Pace 7
Seal the Edges
- Fill the gap between the floor and drywall with acoustical sealant or silicone caulk.
- Seal cracks at the corners where walls meet other walls or the ceiling.
- Pro tip: Scrape abroad the excess sealant with a putty knife and so you tin can finish these corners with joint compound equally y'all normally would.
- Seal effectually electrical boxes.
Pace eight
Seal Doors with Gaskets
- Seal doors by applying adhesive-backed gaskets to the stop moldings.
- Note: This will make your door harder to close, and yous may take to install an adjustable strike plate to compensate for the thickness of the gasket.
- Install "jamb extensions"—strips of wood that brand the door jamb flush with the drywall.

Step 9
Add a Transition Strip
- Seal the gap under a door with a door sweep and a wood transition strip.
- Annotation: A woods transition strip covers the articulation where two types of flooring encounter and provides a ridge for the sweep to seal against. Metal strips don't work with sweeps considering they aren't thick plenty.

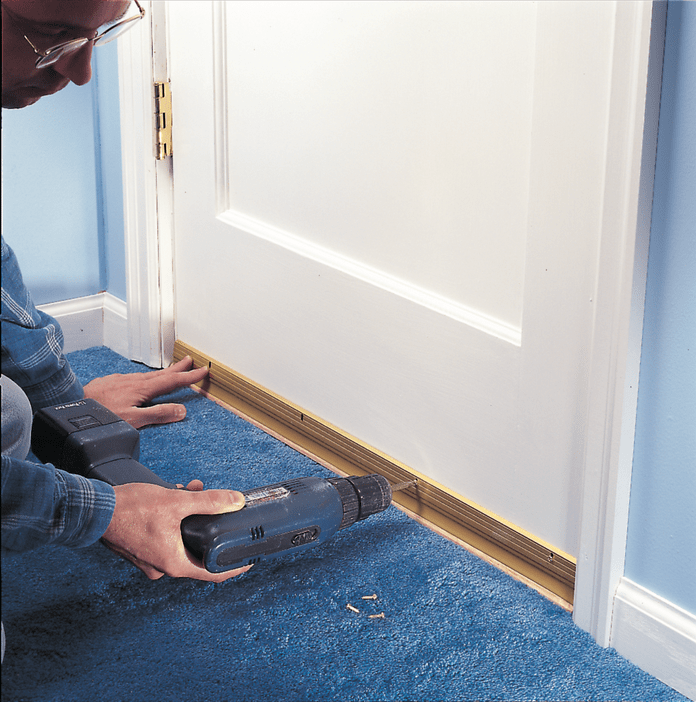
Pace 10
Add together a Door Sweep
- Screw a sweep to the back of the door, low enough and so that it seals against the transition strip.
- Pro tip: If you have no need for a transition strip, you can use an automatic door sweep, which rises above the flooring when the door opens and drops down when the door is closed.
Problem Areas
Ducts
The metal ducts of a forced-air heating/ cooling system are a dissonance fighter'south archenemy. They not only punch large holes in a room but also carry sound throughout a house. If there are metallic ducts connected to the room you want quieted, heed to the sounds entering the room. If they're primarily coming through the ducts, this insulation/resilient aqueduct project won't assistance, no matter how soundproof you make the walls. And unfortunately, in that location's not much you can practise nearly metal ducts, short of lining them with fiberglass or replacing them with fiberglass ducts (big, often impractical projects).
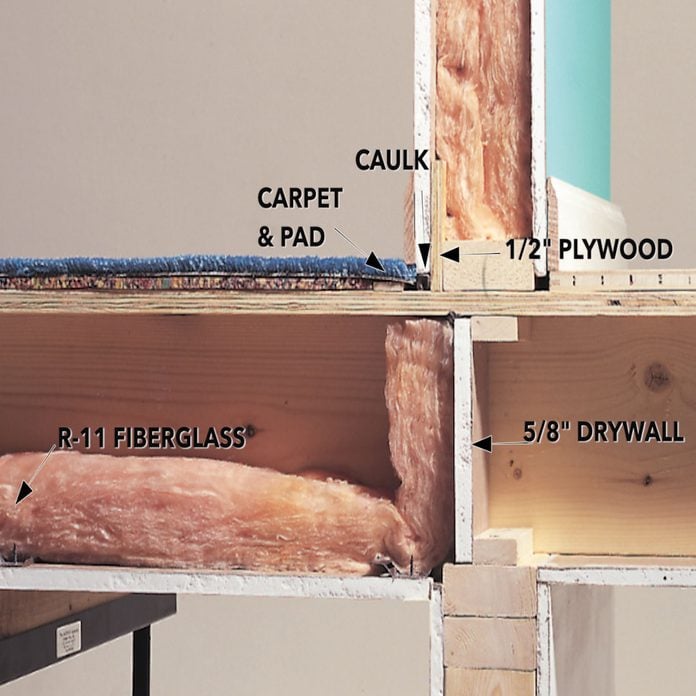
Floors
The all-time style to keep sound from passing through a floor or ceiling into the room above or below is to use insulation and resilient channel. Ripping drywall off a ceiling in a room where y'all're stripping the walls anyway isn't such a big deal. Simply if you want to go along sound from traveling through the flooring of a room, you accept to tear out the ceiling in the room beneath or purchase an acoustical flooring covering. The good thing about stripping a ceiling is that you tin block off spaces between joists.
Annotation: If the audio coming through your ceiling is primarily "impact racket" (such as footsteps or toys slamming against the flooring), the best set up is a heavy carpet and pad.
Doors
A typical wood-console or hollow-core door has an STC rating of near 17. By sealing betwixt the jamb and wall framing, and calculation weatherstripping gaskets and a door sweep (Photos 9 through 11), y'all can raise the STC to 20; that'south an easy, noticeable improvement, but possibly not enough.
A sound barrier is only equally practiced as its weakest bespeak. Then if you go to the trouble of edifice a l-STC wall with a 20-STC door, most of the benefit will be lost through the door. Keep this in listen when you decide whether or not to add insulation and sound channel to a wall with a door.
To reach an STC rating higher than xx, yous have to replace your door and jamb. A well-sealed solid-core woods door has an STC of nigh 28. "Acoustical" wood doors with STCs in the thirty-to-50 range are too available. Nigh lumberyards stock or can social club interior solid-core doors, but for acoustical doors, your best bet is a supplier that caters to commercial structure.
Soundproofing Do's and Don'ts
Hither are some rules of thumb for stopping sound:
- Caulk similar crazy. Your goal is an closed room. Caulk around electrical boxes, calorie-free fixtures, and plumbing and heating lines. Seal upwards even the smallest holes and cracks. Remember, if air can pass through, then can sound.
- If you have old plaster-and-board walls, don't remove them to add together insulation and resilient channel. Plaster-and- board walls are adept sound-stoppers. To improve them, just seal cracks and gaps.
- Removing ceiling drywall gives you a great opportunity to add calorie-free fixtures. If you choose recessed lights, purchase those rated "IC" so y'all can environs them with insulation. Other recessed fixtures must not come in contact with insulation.
- You must remove existing drywall before installing resilient channel. Don't simply adhere the aqueduct over existing drywall.
- If you go to the problem of vehement off drywall, don't cheat yourself by using resilient channel or insulation alone. Apply them together and you'll proceeds up to 15 STC points. Only use either one alone and you'll proceeds but four or five.
- Don't bother attaching resilient aqueduct to both sides of a wall. I side does the chore.
- Don't use resilient channel on steel studs. Steel studs absorb vibration by themselves, so there'southward no need to utilise sound channel. A steel-stud wall with insulation lonely performs about the same every bit a woods-framed wall with insulation and resilient aqueduct.
Originally Published: October xix, 2020

How Much Should I Pay The Carpenter To Put In Insulation And Sheetrock In A 12 By 28 Size Roof,
Source: https://www.familyhandyman.com/project/how-to-soundproof-a-room/
Posted by: mcconnellunifect.blogspot.com
0 Response to "How Much Should I Pay The Carpenter To Put In Insulation And Sheetrock In A 12 By 28 Size Roof"
Post a Comment