

How To Transfer Music From Iphone To Ipod Without Itunes
How to Transfer Music from iPhone to iPod

iPhone and iPod offer you great quality music whenever you're on the go. People do prefer iPod as a separate device specially designed to serve music purposes. Apple users purchase hundreds of songs on their iPhone from iTunes and other sources. And when it comes to transferring music you purchased on your iPhone to iPod, mostly people get clueless. You cannot make a direct transfer of songs from an iPhone to an iPod, but the songs you purchased from the iTunes Store can be re-downloaded to your iPod without any new cost (as long as you use the same Apple ID). But what about the songs you get from other sources? How can you directly transfer all the purchased and non-purchased songs from iPhone to iPod? Do not worry, you can transfer the music from your iPhone to your iPod following the simple methods discussed in the article.
- Part 1. How to transfer iTunes purchased songs from iPhone to iPod
- Part 2. Transfer all or selected songs from iPhone to iPod (Strongly Recommended)
Part 1. How to transfer iTunes purchased songs from iPhone to iPod
One quick method to transfer iTunes songs you purchased on iPhone to iPod is using iTunes, it provides iPhone users the ability to transfer all purchased songs from iPhone to their iPod. You can download your purchases to iTunes on your Mac and then sync it to iPod. You can find your purchases in the iTunes Store. Let's learn how you can access and transfer purchases with the help of a step by step tutorial:
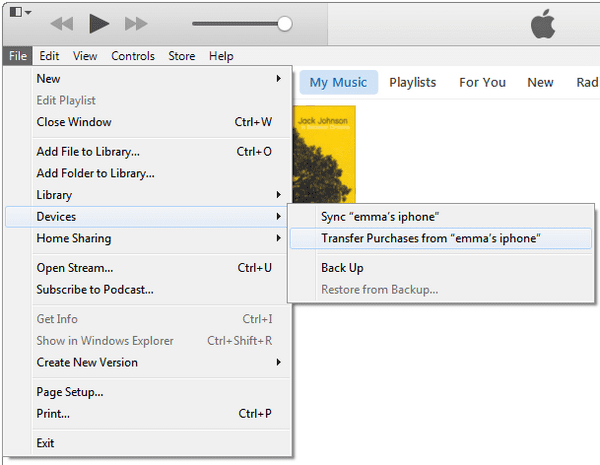
Step 1. Download and install the latest iTunes version. Connect your iPhone using its USB cable you received with it and launch iTunes. Now, on the File menu, go to Devices, then click Transfer Purchases. You can also right-click on your iPhone's name in the left pane of the iTunes window and then hit Transfer Purchases.

Step 2. Next step is to plug your iPod into your Mac. Once your iPod appears on the left pane of the window, select it by its name and hit Sync. Sync option will make sure all the music you've copied to your iTunes copied to your iPod. On clicking Sync transfer process will begin. Wait for the process to finish and on completion, the purchases you have copied from your iPhone to your computer will be added to the iTunes library, will be available on your iPod.
Part 2. Transfer all or selected songs from iPhone to iPod (Strongly Recommended)
While making music transfer from iPhone to iPod, iTunes can't transfer non-iTunes purchased songs, which can be downloaded from free music app, internet or share by friends. To transfer non-iTunes purchased songs from iPhone to iPod, one of the best options is to use dr.fone. dr.fone is an ultimate solution for your iDevices and Mac. With dr.fone, you can transfer music from your iOS device to your Mac in a very simple way. Not only music but you can also transfer iPhone videos, playlists, and photos to your Mac. dr.fone is a quick and easy option to copy files to and from your iOS device without using iTunes. Not only file transfer but you can also convert videos or music files to a format your iOS device recognizes to play. Wondershare's dr.fone is highly recommended software by its users for converting and copying files that iTunes and iOS do not support natively.
Step-by-step guide on how to use dr.fone to transfer songs from iPhone to iPod.
Step 1. To transfer songs from iPhone to iPod using dr.fone, run the software and connect the 2 devices you want to transfer audio files between. When connected successfully, you can see that both of them are listed in the device drop-down list. Please make sure you have selected the source device. The source device should be displayed in the main window.
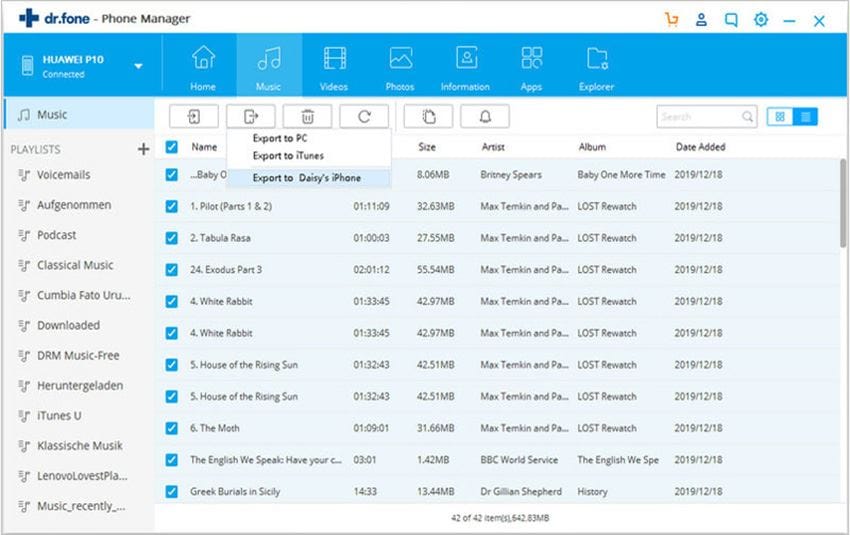
Step 2: Click the "Music" tab on the top of the main window. Next, you can see all audio files are sorted by category and displayed in the sidebar. Supported audio file types are songs, Podcast, iTunes U, audiobooks, and playlists. Click the file type in the left sidebar, then click to select the songs you need to transfer to another device. Click "Export" > "Export to (the name of the second device)". That's it!
Peopel Also Ask
Wondershare ID is an easy way to access Filmora's resources, keep track of your product's activation status, and manage your purchases. Use your Wondershare ID to sign into Filmora and Filmstock. More products and services will be connected in the future. If you want to know how to create and activate a Wondershare ID, please click here >
How to Access to Filmstock / Filmora's Effects?
Filmstock is an amazing source of effects resources for Filmora users to use in their videos! You'll find animated titles, motion graphics, filters, intros, overlays, and more. To get effects packs you need to log in from the Effects Store with your Wondershare ID, and subscribe for access to all Filmora's effects. Click here to learn more details about Filmora's effects.
Does iSkysoft Have More Software Categories to Recommend?
You Might Also Like
> Music > How to Transfer Music from iPhone to iPod
How To Transfer Music From Iphone To Ipod Without Itunes
Source: https://www.iskysoft.com/mobile-tips/transfer-music-from-iphone-to-ipod.html
Posted by: mcconnellunifect.blogspot.com
0 Response to "How To Transfer Music From Iphone To Ipod Without Itunes"
Post a Comment