How To Record Time Lapse On Iphone
As you might already know, a video is essentially just a series of still photos shown in quick succession. When played back, these fast-moving images trick your mind into perceiving movement. A time-lapse video, by contrast, is a collection of still photos taken over a longer period of time and played back at the same speed as a regular video. The result is an amazing compression of time — think clouds zooming across the sky, flowers quickly bursting into bloom, and day turning to night in the blink of an eye.
Armed with your iPhone, some patience, and a bit of creativity, you can easily make a time-lapse video of your own. This guide will help you get started with creating beautiful and easy time-lapses.


Understanding time-lapse on iPhone
Using your iPhone to capture a time-lapse video is made simple through Time-lapse mode in your Camera app. This feature allows your phone to automatically shoot 1–2 frames per second for as long as you want, making it easier than ever to capture unique time-lapse videos with the tap of a button.
What is time-lapse, and what does the name mean?
Time-lapse is a popular photographic technique used to speed up the perception of time. By recording a series of photographs depicting a scene that usually changes slowly over time and then speeding up the playback, you can make the action appear to occur unnaturally quickly.
How time-lapse works on iPhone
Unlike shooting a time-lapse with a traditional camera, shooting with an iPhone means that all the preparation is done for you behind the scenes. When you choose Time-lapse mode on your iPhone, it will automatically shoot your scene at 1–2 frames per second, depending on how long you choose to shoot for.
Most time-lapse recordings on iPhone play back in 20–40 seconds, regardless of how long you shoot. That's because the longer you record, the fewer frames will be captured each second, and the more dramatic the final effect will be.
https://www.instagram.com/p/CC3_QidnXdQ/
How much faster is time-lapse?
Your time-lapse video will play back at 30 frames per second, and the final speed will depend on how much footage you've captured with your iPhone. If you've recorded for less than 10 minutes, the iPhone Camera app will capture 2 frames per second. When played back, this results in a final video that is 15x normal speed.
If you record more than 10 minutes of footage using the Time-lapse feature, your iPhone will discard half of the frames you've already captured in order to keep the video short. Your final video will now be 30x normal speed. The more footage you shoot, the more your frame rate will drop, and the faster your final video will become.
Shooting time-lapse photography
Now for the fun part — getting out and shooting your own time-lapse videos with your iPhone. You'll find that the Time-lapse feature in the Camera app is quite intuitive to use. The more you create, the better your time-lapse videos will become. Here's an overview of how to use your iPhone for time-lapse photography, as well as some tips for making your time-lapses stand out.
How to use the Time-lapse feature
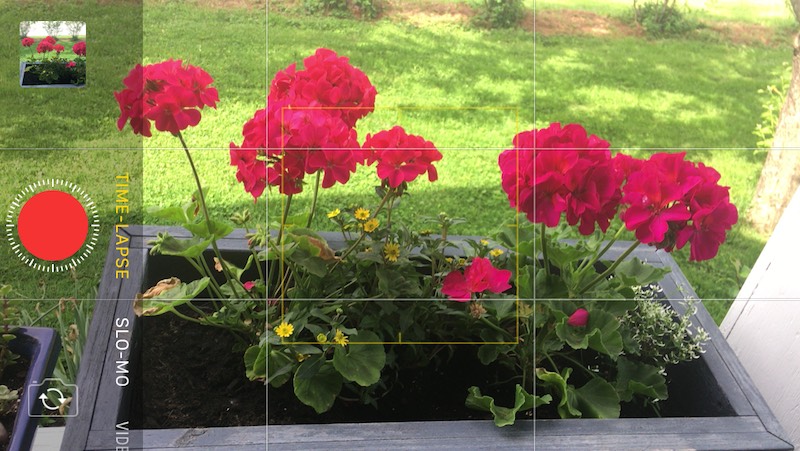
- Open your Camera app on your iPhone.
- Scroll through the shooting options right above the shutter button and tap Time-lapse.
- When you are ready to record, tap the red record button.
- Tap the red record button again when you want to stop recording.
- Your time-lapse video will be saved to your Photo library under Recents and Time-lapse.
How to shoot a better-quality time-lapse video
Time-lapse videos work best when you are shooting a slow-moving scene, like the change from day to night or a flower opening up to the sun. You can also get creative with your time-lapse videos by shooting street scenes with crowds of people, traffic at a busy intersection, or a DIY project at home. No matter what you choose as your subject matter for your next time-lapse, here are some tips to make it better:
- Always use a tripod. The key to an awesome time-lapse is capturing movement in several frames from the same spot, and the easiest way to do this is with a tripod and a remote shutter.
- Use AF/AE Lock. You want the focus and exposure to be the same for every frame in your time-lapse, so be sure to hold your finger down on the screen and lock the exposure and focus before shooting.
- Shoot with a full battery. Not surprisingly, shooting a long recording like a time-lapse will require a lot of juice, and you don't want your iPhone to die before you finish. Make sure your battery is fully charged before starting your time-lapse project.
Fresh ideas for a time-lapse video
Classic time-lapse videos include the setting sun and clouds zooming overhead, but that's just the beginning. Once you get those creative juices flowing, you'll find that inspiration for time-lapse videos are everyone. Here are a few ideas:
- An urban street scene. Find an interesting vantage point where you can capture a busy part of your town or city. Shoot for at least 30 minutes and see what your camera comes up with. Try shooting the same scene at different times of the day.
- The tides going in and out. Ocean tides go in and out twice a day at a cycle that is roughly 12 hours long, which means you can capture the time between high and low tide in about 6 hours. Look for a spot that will enable you to capture wildlife (crabs, birds, and insects), as well as the waves going in and out.
- A fun art project. Seeing a work of art transform before your eyes can make for a mesmerizing time-lapse video. Set your camera up on a tripod aimed at a blank piece of paper and capture one or two frames per second as you sketch, draw, or paint.
- A DIY or construction project. Whether you're baking a new recipe or remodeling your bathroom, this process can be captured as a from start to finish. Find a good vantage point where your phone won't be in the way, set it up, and get to work on your project. (This is a great one to share with other DIYers for inspiration.)
Editing a time-lapse video on iPhone
Shooting footage for your time-lapse video is only half the process — and only half the fun. Now you can do some editing to make your time-lapse really stand out. Basic edits can be made right within the Photos app, but some editing, like changing the speed of a time-lapse, will have to be done through a third-party app.
How to change the speed of a time-lapse video on iPhone
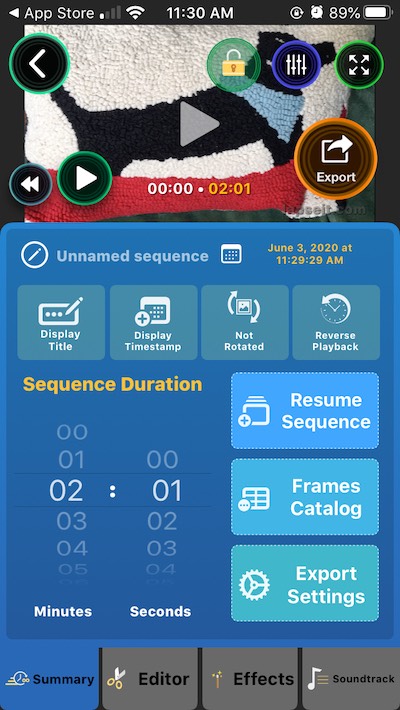
If your finished time-lapse video plays too fast or too slow and you want to change it, you'll have to use a third-party app like Lapse It. To make your time-lapse play over a longer time frame, the Lapse It editor will simply add in duplicate frames to stretch out the footage. Or, to make a video shorter, the editor will shorten the frame rate. Here's how to use Lapse It:
- Download the Lapse It app and open it on your iPhone.
- Tap import at the top of the screen and give the app permission to access your photos.
- Tap the videos and/or photos you want to edit. If you select more than one, they will all be added to the app.
- Use the minute and second indicator to set the time frame for your video. If you set it for longer than the original, new frames will be added. If you set it for shorter than the original, the frame rate will be reduced.
- Tap the play button on your video to play it back.
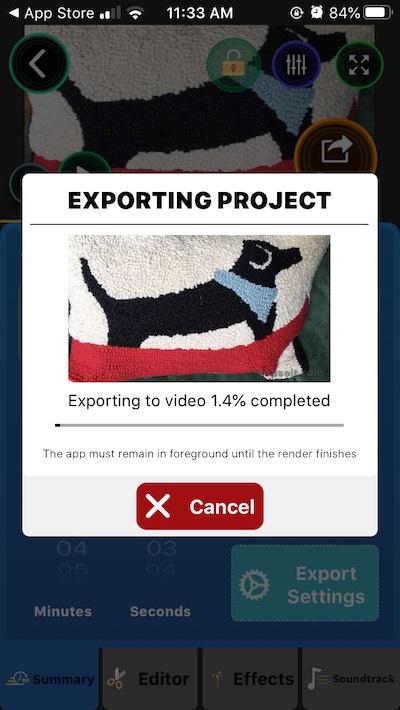
- When you're finished changing the speed of your time-lapse video, tap export to save your new video to your Photos.
How to trim and crop a time-lapse video
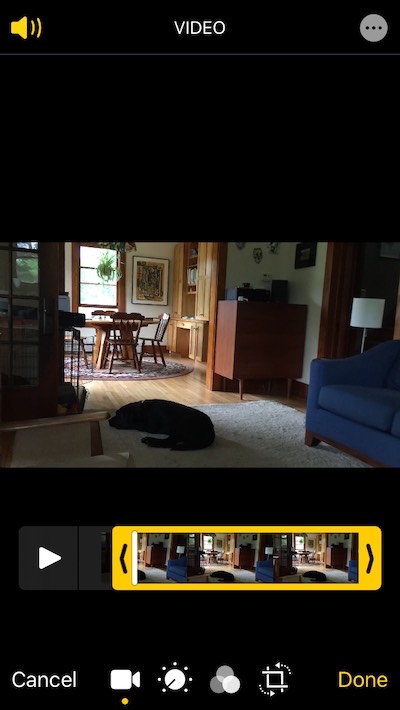
You can trim or crop your time-lapse video on iPhone using your Photos app in the same way that you would crop any video. When trimming a video using the Photos app, you can only make the video shorter by trimming the ends. Here's how to do it:
- Open your time-lapse in Photos and tap Edit.
- Slide your finger along the timeline at the bottom of the screen until a yellow box appears.
- Use your finger to slide the arrows on either side of the timeline to trim parts from the beginning or end of your video.
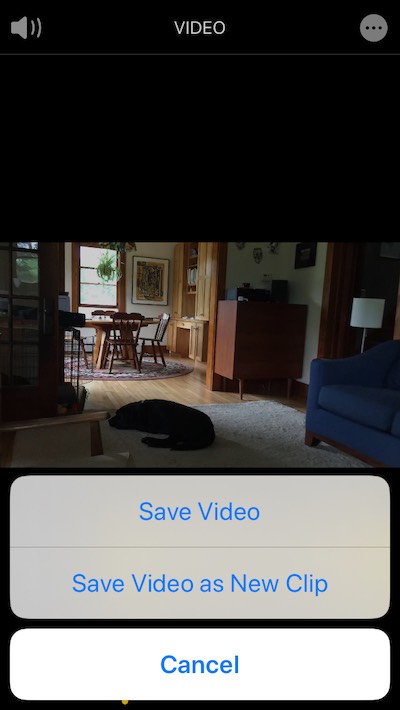
- Tap Done and choose either Save Video or Save Video as New Clip.
Here's how to crop a video using Photos:
- Open your time-lapse video in Photos and tap Edit.
- Tap the crop icon at the bottom of the screen.
- A white outline will appear around your time-lapse photo. You can drag the edges of the outline to adjust the size and orientation of your time-lapse.
- You can use the features at the bottom of the screen to adjust your horizon line, as well as change the vertical and horizontal proportion. Simply choose the icon and slide your finger along the bottom to make your adjustments.
How to add a filter to a time-lapse video
There are several color and black/white filters you can choose from when using the Photos app. Here's how to apply a filter to your time-lapse video:
- Choose the video you want to add a filter to and tap Edit.
- Tap the filter icon at the bottom of the screen.
- Use the slider to choose one of nine filters. Keep in mind that the filter will be applied to the whole video, and there is no way to adjust the strength of the filter.
- When you find one you're happy with, tap Done.
- The changes will be applied to your time-lapse video.
All of these edits can be applied to any video, not just a time-lapse, so check out our guide to editing videos on iPhone using the native iOS apps Photos and iMovie.
The Time-lapse shooting mode on your iPhone is a fun tool to experiment with, allowing you to create fun videos and stop-animation at the press of a button. It's an addictive photography tool, and once you start, you'll be hooked on making time-lapse videos. Also check our detailed guide on how to shoot a cinematic hyperlapse video with an iPhone.
This was about:
- iPhone Camera
- Videography
Tara Schatz
Travel writer. Photographer. Lover of dogs and the outdoors.
How To Record Time Lapse On Iphone
Source: https://backlightblog.com/time-lapse-video-iphone
Posted by: mcconnellunifect.blogspot.com

0 Response to "How To Record Time Lapse On Iphone"
Post a Comment